Grilled Stone Fruit and Bleu Cheese Spinach Salad with Honey Vinaigrette

Summer SaladsI get so excited about salad…seriously. And summer is the best season to play around with different combinations of flavors and textures because there’s such a wide variety of in-season fruits and veggies to try.  Salads, though historically considered the forgotten side dish (or first course) – something you have to endure in order to get to the “star” of the meal – the main course- do not only serve as a mere opportunity to consume some veggies, but can actually serve as the star of the meal. Yes, I do mean the main course! For lunch or dinner (or why not for a snack?), salads offer a pallet of different colors, flavors, and textures.  It’s artistic, really. The beauty of salad is, you can’t really go wrong.  No matter what base you use or ingredients you add in, you never wind up with a bad combination.

The basics:

    • Greens – Dark, leafy greens such as spinach, kale, Romaine lettuce, and arugula serve as not only a beautiful, rich base upon which to pile up colorful toppings, they are super healthy and tasty. Water-based lettuces such as iceberg lettuce are also a good base because they are incredibly refreshing especially on the hottest of summer days.
    • Tomatoes – Deep red tomatoes (grape, cherry, or sliced wedges of larger tomato varieties) are always a hit.  Try heirloom varieties that add different color impressions – purple, yellow or orange tomato varieties.
    • Other Veggie Add-Ins – shredded carrots, thinly sliced radishes, purple onion slivers, colorful bell pepper strips (red, orange, yellow, purple), and, of course, cucumbers
    • Protein – If serving salad as a main course, protein is an important consideration. Add meats such as chopped turkey breast or ham, grilled or roasted chicken, tuna fish (canned or fresh), other seafood such as cooked salmon, or shellfish such as shrimp and crab meat are awesome add-ins. Even hard-boiled eggs. The possibilities are endless. If going meatless, add beans, any variety or a mix of a few different varieties – garbanzos, kidneys, black-eyed peas, etc. Again, endless possibilities
    • Fruit – berries of any kind – blueberries, raspberries, strawberries, apple/pear slices. Try grilling fruit such as peaches, plums, apricots, watermelon, pineapple. So Good! Add dried cranberries. Try citrus fruit such as orange or grapefruit segments.
    • Crunch – I like some crunch in my salads. In my opinion, they make salads more satisfying. Opt for the traditional crouton (you can make these yourself), or try nuts (almonds, peanuts, chopped walnuts, pecans, hazelnuts).
    • Cheese – I don’t know about you, but I love cheese in my salad. It just adds another level of flavor and texture that’s so satisfying. Sharp, flavorful cheeses take salad to the next level.  Try feta, goat cheese, bleu cheese, fontina, parmesan, or ricotta salata (similar to feta). Sharp cheddar is an excellent addition, too. Cubed, shredded, or crumbled, you can’t go wrong with a little cheese atop your salad 🙂
    • Dressing – You can’t go wrong with a drizzle of extra virgin olive oil and any kind of vinegar – balsamic, wine vinegars, apple cider vinegar, squirt of lemon juice, etc.  YOU DO NOT NEED TO BUY BOTTLED SALAD DRESSINGS! It’s taken me awhile to realize this.  I always stocked my fridge with bottles upon bottles of salad dressing. Not anymore! Dressing is so easy and inexpensive to make yourself with ingredients you have on hand.

The salad featured in the photo is a Grilled Stone Fruit and Bleu Cheese Salad with a Honey Vinaigrette Dressing. So easy and good!  Here’s how I did it:

Spinach/Kale mixed greens
Grilled Peach and Apricot Slices – Spray a grill pan with non-stick cooking spray, and preheat over medium heat. Slice stone fruit around pit and remove (similar to how you would slice an avocado). Slice in wedges and place on grill. Grill for about 4 minutes per side.
Crumbled Bleu Cheese
Chopped walnuts
Handful of dried cranberries

For the dressing:
Most dressing recipes you read will call for a 2 to 1 ratio of oil to vinegar. I say “bunk”! I use equal amounts of oil and vinegar; otherwise, all you taste is the oil. Also, use good quality extra virgin olive oil. A little dressing goes a long way here.

1 tbs honey
3 tbs apple cider vinegar
3 tbs extra virgin olive oil
dash of salt & pepper to taste

Whisk all ingredients together and pour over salad right before serving. Couldn’t be easier!

Old Bay Tuna Cakes with Dill Yogurt Sauce

tuna cakesSo on Wednesday evening, it was time to make dinner, and of course, as the story goes, I had nothing planned for dinner.  While I’m slightly annoyed with myself for not planning better (I am a professor after all – planning is what I do), it gives me an opportunity to be creative with ingredients I have on hand.  It also challenges me to discover what I can throw together in a little bit of time.  Since the weather has been nicer, we’ve been working and playing outside in the evenings – getting the garden ready, shooting hoops with the kiddo, and just enjoying the warm sunshine as much as possible. With the days getting longer, it’s hard to tell that it’s getting late in the evening, so I often do need a healthy meal that comes together in literally minutes, and this is it!

Throwing together a last-minute meal is super easy if you have a few items on hand.  A few of my staples that I always keep on hand are:  cans of chunk light tuna in water (tastier than solid white tuna), Old Bay seasoning (I’m a mid-Atlantic gal, after all) lemons, seasoned bread crumbs (I store these in the freezer), and plain 0% fat Greek yogurt.  Now that my herb garden is planted and in full bloom, I have fresh herbs, too!  My herb garden consists of basil, chives, chocolate mint, cilantro, and dill.  The dill came in quite handy with this recipe.

I must admit, at first, I was a little concerned that this would come out too fishy – bleh – but I was pleasantly surprised that this was so good!!  Really, we couldn’t even tell it was tuna.

Old Bay Tuna Cakes with Dill Yogurt Sauce

  • Difficulty: easy
  • Print

Ingredients (Approximate measurements)
2 eggs, lightly beaten
1/4 cup bread crumbs (seasoned or unseasoned)
1 lemon, juiced
1 tbs Dijon mustard
3 tbs Greek Yogurt
1-2 cloves garlic, finely minced
1 celery stalk, diced
a few dashes of hot pepper sauce
1/2 tbs onion powder
1 tbs Old Bay seasoning
1/2 tsp fresh ground black pepper
1 tsp olive oil
1 large can chunk light tuna in water, water drained

Preheat oven to 350 degrees F. Spray a flat baking sheet with non-stick cooking spray. In a large mixing bowl, add the first 12 ingredients. Whisk until combined. Flake tuna with a fork, and fold into mixture. Wet hands with cold water, and form into patties of desired size. I was able to get 6 large patties out of this mixture. The mixture is quite sticky; wetting your hands makes forming the patties easier. Place on prepared baking sheet, and bake in preheated oven for about 10 minutes per side. Top with Dill Yogurt Sauce.

Dill Yogurt Sauce
1/4 cup 0% Greek yogurt
1/2 lemon, juiced
1-2 tbs mayonnaise (this cuts the tartness of the yogurt a bit)
3-4 tbs fresh dill, chopped (reduce to 1-2 tbs if using dried dill weed)
Sea salt and black pepper to taste

Mix all ingredients together. For best results, chill for a few hours before using, but you can use it right away if short on time (like I was). The longer the sauce chills, the more robust the flavor because they get a chance to meld together.

Stellar Turkey Burgers

Stellar Turkey Burgers“Stellar” is another word I am trying to use more often.  I don’t know why, but I think it fits, and it’s fun to say 🙂

First off, I’m going to apologize for this photo.  It sucks, I know.  But I hadn’t originally planned on blogging this recipe; the end result was so “stellar”, though, that I had to share it.  I just took a quick snapshot.  I know I can do better.  When I make these again, I’ll take a more attractive photo and replace this awful one with it.

Here’s the thing about burgers…I ❤ them.  I really do!  Beef burgers are great and all, but I like turkey burgers better for a few reasons…1) they’re healthier and leaner…2) ground turkey is so much less expensive than ground beef…and 3) minimal shrinkage.  I’m sorry, but I’m tired of all my beef burgers (that were so expensive in the first place) shrinking down to almost nothing.  Yes, I’ve tried every trick in the book including the “thumb print” trick to no avail.  I’ll stick with ground turkey (ground chicken works great, too!).  Really, tasty turkey burgers can be thrown together using any spices you have in your spice cabinet.  I don’t measure ingredients; I just sprinkle in however much of whatever ingredient I want until it looks like enough.  Measurements below are approximate, so you can adjust however you’d like 🙂

Stellar Turkey Burgers

  • Servings: 4-6
  • Difficulty: easy
  • Print

Ingredients

1.3 lbs ground turkey or turkey breast
1/4 cup bread crumbs (seasoned or plain-I prefer seasoned)
1/2 cup milk
3 cloves fresh garlic, minced (or 1/2 tbs garlic powder)
1 tbs parsley flakes
1 tbs paprika
1 tbs olive oil
1/2 tbs onion powder
1/2 tsp seasoned salt
1/2 tsp black pepper
few dashes hot pepper sauce (about 1/2 tsp)
few dashes Worcestershire sauce (about 1 tbs)

Method
Preheat broiler or outdoor grill. Add all ingredients EXCEPT ground turkey to a large mixing bowl, and whisk together. If mixture is too dry, add a bit more milk, 1 tbs at a time until desired consistency is reached. Mixture should not be “watery”, but should not be powdery dry either.

Add ground turkey to mixture, and mix with your hands just until ingredients are combined. Do not overwork the meat as it will become tough. Form meat mixture into 6 even patties. Wet your fingers with cold running water to make pounding out the patties easier.

If broiling, place on broiler pan, and broil on high for 8 minutes per side, until internal temperature reaches 175 degrees F. If grilling, place on grill and cook until internal temperature reaches 175 degrees F, flipping burgers once halfway through cooking.

Top with lots of yummy cheese if desired, and serve on buns, lettuce leaves, or tortilla wraps.

Addictive Sauteed Pork Chops

Addictive Sauteed Pork Chops

It’s the “other white meat” that has given me a cooking fit for years!  It seems there’s not a broad enough error margin when cooking pork chops; if you cook them a minute too long, they’re dry and tough, but if you cook them a minute too short, the chops are undercooked.  It took me many years to master that delicate balance. Pork chops are yet another endeavor at which I failed enough times to give up on just like my creamy white cheddar shells and cheese.

The truth is, I love pork, and it is rather lean and healthy, so I decided to read up on cooking methods and cooking times.  I found this handy-dandy cooking chart released by the National Pork Board. I was amazed to discover that pork only needs to cook to an internal temperature of 145 degrees, and it can be a little pink inside.  With my new-found knowledge, I was ready to revisit this endeavor, and I’ll tell ya that I now love cooking pork chops!  These addictive sauteed pork chops come out perfectly cooked every time, and they only take minutes to prepare – a quick dry spice rub made from whatever dried herbs & spices you have on hand – and you’ve got it! Need a healthy, super quick dinner option for a busy week night?  My addictive sauteed pork chops are just the ticket.  Guaranteed to be gobbled up by adults and kids alike!

Below are the spices I used, but go ahead and get crazy and experiment with whatever you have on hand…

Ingredients

4 boneless pork chops, about 1/2 to 3/4″ thick
2 tbs canola oil
1 tsp kosher salt
1 tsp freshly ground black pepper
1/2 tbs onion powder
1/2 tbs garlic powder (or mince 2-3 cloves of fresh garlic – I would’ve done this, but I was out of fresh garlic)
1 tbs parsley flakes
1/2 tbs rosemary leaves
1 tsp dried tarragon
1 tsp dried thyme leaves
a few shakes of seasoned salt
1/2 tsp paprika

Method

Heat oil in large skillet over medium-high heat. Meanwhile, pat chops dry with paper towel. You can either mix up the spices in a bowl, or do what I did, and just sprinkle each ingredient over the chops individually. Why dirty another bowl?

Rub seasonings into both sides of pork chops with your hands. Give those babies a good rub down – really work the rub into the chops, but be gentle enough to not overdo it.

Sautee pork chops according to the chart. About 4-6 minutes per side. Obey the pork. If you attempt to turn it, and it sticks, don’t force it! They will naturally release when they’re good and ready. Check internal temperature with a meat thermometer. When thermometer reads about 135/140 degrees, remove chops to serving plate, and let them rest for 3 minutes! Doing so allows the juices to redistribute. The temp will also continue to rise while the chops rest bringing the internal temperature up to 145 degrees.

Serve with Easy Herb Roasted Potatoes

Creamy White Cheddar Shells and Cheese

DSCN0303[1]For years, and as a beginning home cook, I searched far and wide for the best homemade macaroni and cheese recipes.  I failed so many times at making homemade mac ‘n’ cheese that for many years, I gave up on it and resorted to the good ol’ blue box of mac ‘n’ cheese.  As a more experienced cook nowadays, I decided to revisit this endeavor, and I am so glad I did!  I came up with the creamiest most decadent, yet sophisticated and elegant mac ‘n’ cheese recipe that is so easy and quick to prepare!  In no way is this recipe low in calories, so I reserve this for special occasions…sometimes 😉

To bake or not to bake?  I don’t bake my mac ‘n’ cheese because I believe it stays creamier when I don’t; however, sometimes if my sauce is a bit too runny, I bake it for about 15 minutes at 375 degrees, and that tightens it up a bit.

Crunchy topping?  Nope – not on my mac ‘n’ cheese, but go ahead and add it to yours if you like.  To me – I just don’t care for that crunchy texture in my mac ‘n’ cheese.

Ingredients

1 cup small seashell-shaped pasta, uncooked (or any small cut pasta)- about 1/2 a box
3 tbs butter
3 tbs all-purpose flour
2 cups 2% milk
4 oz cream cheese, softened
1 tbs Dijon mustard (good quality)
1/4 tsp dried tarragon
1/2 tsp dried parsley flakes
1/2 tsp garlic powder
1/2 tsp onion powder
1/4 cup Parmesan cheese, grated
8 oz block sharp white cheddar cheese (good quality), hand-grated
Salt & pepper to taste

Method

Bring a large pot of water to a boil. Season with plenty of coarse salt. Cook pasta according to package directions.

While pasta boils, make a roux by melting butter in a separate medium saucepan. Add flour, and whisk constantly over medium heat for 1 to 2 minutes. Gradually whisk in milk. Continue cooking over medium heat for about 5-7 minutes, whisking periodically to break up any lumps that may form from the roux ingredients. When sauce mixture is smooth and thick enough to coat the back of wooden spoon, remove it from the heat.

Whisk in cream cheese, Dijon mustard, tarragon, parsley flakes, garlic & onion powders until combined. Add grated cheeses, and stir until smooth. Taste the sauce. Add S & P as needed.

Drain pasta, and add pasta to cheese sauce mixture, or if that pan is not big enough, return the pasta to its original pan and add cheese sauce to pasta. Gently fold pasta and sauce together.

Linguini with Kale Pesto and Shrimp

DSCN0191[1]Pesto sauce.  It’s that velvety green goodness that clings to pasta in the most decadent way.  It hugs each strand of pasta as if hanging on for dear life.  There are so many ways to make pesto sauce, and it’s SO EASY to make.  Just a few ingredients into a food processor and it’s done!

Classic pesto sauce is a combo of fresh basil, fresh garlic, sometimes pine nuts, fresh parmesan cheese, and olive oil.  You’d think with such a perfect combination of flavors, why mess with perfection, right?  Well…lately I’ve been thinking about changing up the ingredients a little to create new variations on pesto sauce.  I’ve heard of pesto made with arugula, spinach, even green peas, but I had a brainstorm and thought…why not kale?  Kale is so popular now, that I thought why not give it a try as a pesto sauce?  When I told my husband about my idea, he grimaced a little, and half-heartedly said, “It’ll PROBABLY be good.”

…I don’t do “PROBABLY good”, so the challenge was on…

So I threw some kale, garlic, olive oil, parmesan cheese in a food processor, boiled some linguini, and sauteed some shrimp, and let me tell you…he gobbled almost the entire serving bowl, literally.  I couldn’t believe it.  He said he would’ve finished the whole bowl, but he was full.  And there it is.  BOOM!

I didn’t add nuts because first, I didn’t have any, and second, I don’t really think they’re needed.  If you want to though, I think almonds would be great in this kale pesto.  If you try it, let me know.

First, take a bunch of kale greens, and rinse them really well.  You’d be surprised how much loose dirt comes off them. Dry them with papertowels.

I decided to tear the greens off the stems.  The stems are quite fibrous and tough, and the leaves tear off really easily.

DSCN0180[1]Then, throw the leaves into a food processor, and add about 3 cloves of peeled garlic, about 1/4 cup freshly grated parmesan cheese, kosher salt & freshly ground black pepper to taste.

DSCN0182[1]Close the lid, and pulse a couple times to break up everything.  Then open the spout at the top, turn the food processor on, and as it whirs, pour in about 1/3 to 1/2 cup extra virgin olive oil.  Continue to process for about 30 seconds until desired consistency is reached.

Pour into a bowl and set aside.

Now you can either make the pesto ahead of time, or if you’re an adept multi-tasker, you can make it while the pasta cooks and the shrimp sautes.  If you do it this way, you’ve got dinner in about 15 minutes or less.  Not bad, huh?

To saute shrimp, place them in an even layer in a non-stick skillet over medium heat.  Cook for about 3-4 minutes per side until shrimp are opaque, pink, and tightly curled.

DSCN0188[1]Ingredients

1 bunch kale greens, rinsed, dried, and torn from stems

3 cloves garlic, peeled

1/4 cup freshly grated parmesan cheese

1/3 to 1/2 cup extra virgin olive oil

~1 tsp each of Kosher salt and freshly ground black pepper

1 12 oz. bag frozen shrimp, thawed, peeled & deveined, tails removed

1 box linguini pasta (or any long pasta you happen to have)

Directions

  1. Place torn kale greens into food processor
  2. Add garlic cloves, grated parmesan, and salt & pepper to food processor.
  3. Close the lid, and pulse a few times to break up ingredients.
  4. Open the chute on processor lid, and turn on food processor.
  5. As it processes, pour the extra virgin olive oil into the chute.
  6. Continue to process for up to a minute until desired consistency is reached.
  7. Taste mixture, and adjust seasonings as needed.
  8. Pour pesto into bowl and set aside.
  9. Bring a large pot of salted water to a boil.
  10. Add linguini, and boil according to package directions.
  11. Meanwhile, saute shrimp in non-stick skillet over medium heat for about 3-4 minutes per side.  Yes, you will have to flip each and every shrimp 🙂  Saute until shrimp are opaque, pink, and tightly curled.
  12. With tongs, remove al dente linguini from boiling water and place directly in skillet with shrimp. RESERVE THE PASTA WATER!!
  13. Add the pesto sauce mixture to the pasta and shrimp in the skillet and toss together with tongs.
  14. If needed, add reserved pasta water to the mixture a ladle-full at a time to loosen up the sauce.  Do this until desired consistency is reached.
  15. Place in a serving dish.
  16. Serve hot or warm with warm crusty bread.
  17. Watch your husband who reluctantly said, “It’ll PROBABLY be good” devour the entire serving bowl 🙂

Turkey Bacon-Wrapped Pork Chops

DSCN0178[1]You ever have one of those days where you’re like, “Crap! It’s almost dinner time, and I have no idea what to make for dinner!”? I feel like I have those days quite a bit now that spring semester has started. I feel like I just CAN. NOT. GET. IT. TOGETHER!! I had that type of day a few days ago. So I literally opened the fridge, and surveyed what I had on hand. Among other items, I had bought a large pack of boneless pork chops that were on sale, and 2 packs of turkey bacon on sale the last time I had been grocery shopping. And all of a sudden…I had THE. BEST. IDEA. EVER. Why not wrap bacon around the chops and bake for a few minutes? Wrapping the chops with turkey bacon not only adds an enormous amount of flavor, but it also keeps the chops moist and juicy – a challenge with which I almost always struggle when trying to cook pork chops to perfection…sigh…

I’ll tell you this main dish was so mouth-wateringly delicious, and it was ready in literally minutes. How did I not think of this before? Turkey Bacon-Wrapped Pork Chops are now in the regular rotation. They are great for busy weeknight meals, or elegant enough to serve to dinner guests. It also helps that they are relatively “skinny” as pork chops and turkey bacon are rather low in fat.

Here’s how it’s done.

DSCN0175[1]Start with four boneless pork chops – 1/2 to 3/4 inches thick.  To rinse or not to rinse?  That is the question.  Most food safety guidelines will tell you NOT to rinse raw meat, and I have to say I agree, BUT I had begun to freeze these before I came up with this fabulous idea, so I did rinse them to clear away any loose ice crystals that may have formed.  Pat them dry with paper towels.  Aren’t they pretty? Next…

DSCN0176[1]Season the chops on both sides with literally anything you have on hand. Here, I used Kosher salt, coarse ground black pepper, rosemary leaves, and a bit of seasoned salt. I also added a bit of onion powder and garlic powder. Parsley flakes, thyme, and/or tarragon would be fabulous!  Massage the seasonings into the meat with your hands (Give those chops a little rub down).  Then…

DSCN0177[1]Wrap those babies up with slices of turkey bacon.  You’ll want to wrap them in such a way that the bacon slices all close on the same side of the pork.  This took me a few tries before I got it right.  Place them seam-side down on a foil-lined baking sheet that’s been sprayed with non-stick cooking spray.

Bake in preheated 375 degree oven for about 15 minutes until pork has cooked through, juices run clear/meat thermometer reaches 145 degrees, and bacon is done to desired level of crispness.

There you have it!  I served these with simple baked potatoes and broccoli.  Yum!

Ingredients

4 boneless pork chops about 1/2 to 3/4″ thick

16 strips turkey bacon

~1 tbsp rosemary leaves, divided

~1 tbsp onion powder, divided

~1 tbsp garlic powder, divided

~1/2 tsp season salt, divided

~1/2 tsp Kosher salt, divided

~1 tsp freshly ground coarse black pepper, divided

Any other seasonings you have on hand, and want to try.  All measurements are approximate.  Use as much or as little as you like, but remember bacon is salty, so you won’t need to add too much salt.

Directions

  1. Preheat oven to 375 degrees.  Line a shallow baking pan with foil, and spray with cooking spray.  Set aside.
  2. Rinse? and pat dry chops with paper towel.
  3. Season both sides of chops with dried herbs/spices and massage into meat with your hands.
  4. Wrap each chop with about 4 bacon slices making sure the ends of the bacon slices close on the same side of the pork chops.
  5. Place wrapped chops seam-side down on prepared baking sheet.
  6. Bake in preheated oven for about 15 minutes until chops are cooked through, and bacon has reached desired crispness.
  7. Wonder why you haven’t thought of this before…

That’s it!  It couldn’t be any easier than that.

Stove-top Beef Stew

DSCN0160[1]

Now that the spring semester has begun, I haven’t been very good at sticking to a meal plan for weeknight dinners.  I know I should be more organized, but once I get into a comfortable routine with the English 101 classes I teach, I’ll get back into my regular meal-planning routine, too….hopefully…sigh…

During my hour-long commute home from work the other day, I had plenty time to ponder what I could make for dinner that night.  It was about 20 degrees outside that day (winter’s getting on my nerves), and I wanted something simple, yet warming and comforting.

Then….the idea came to me like a light bulb!  BEEF STEW!  Oh my gosh, BRILLIANT!!

I love using my slow cooker, don’t get me wrong, but honestly, I knew I wasn’t going to have time to wait for this meal to cook for 4 to 6 hours, and also, I think slow cookers drain the dish of so much flavor, so I didn’t use it and opted for the standard stove top method.

I mentally assessed (from memory because I was driving) what ingredients I already had at home, and what I would need to pick up at the store.  I knew I needed to pick up stew meat, but all the other ingredients I knew I already had on hand.  BOOM! What a rockin’ idea for a cold winter’s night.  I swung into the grocery store, picked up about a pound of stew meat, a nice loaf of crusty bakery bread, and the rest is history.  The great thing about stew is that it’s very forgiving, and you can use just about anything you happen to have on hand. I realized after it was too late that I was out of bay leaf which I normally like to use in long simmering dishes, but this turned out so good, I didn’t even miss it. Here’s what I did…and remember what I say about measurements being approximate 😉

Ingredients:

2 T  oil (I used regular olive oil)
1/4 cup all-purpose flour
1.3 1b stew meat (I bought the kind that was already cut up in the store, but if you can’t get that…beef chuck is a good cut to use)
1 yellow onion, diced
5 carrots, peeled and sliced
3 celery stalks, chopped
1 red bell pepper, seeded and chopped
3 cloves garlic, minced
2 russet potatoes, peeled and chopped
1 cup frozen corn kernels
1 cup frozen peas
1 can Cannelini beans, drained and rinsed
1 carton beef stock
1 4 oz can tomato sauce
2T prepared mustard
2T ketchup
Worcestershire Sauce
1 T corn starch
1 T cold water

Endless Seasoning Possibilities (but here are few suggestions):

Thyme Leaves (dried or fresh)
chili powder
cumin
paprika
rosemary (dried or fresh)
seasoned salt
parsley flakes

Directions:

Heat a large stew pot over medium heat, and add the oil.  Salt and pepper the stew meat to taste and coat in flour. Place coated meat in hot oil and arrange in even layer on the bottom of the pot. Every 2-3 minutes or so, turn the meat to sear on all sides.

Remove meat from pan with slotted spoon and set aside.   The meat is not yet cooked through at this point.

If needed, you can add a little more oil to the pot.  Add onion, carrots, celery, bell pepper, and garlic to the pot.  Heat until onions are translucent, and carrots, celery, and pepper are soft, but still slightly crunchy – This process is called “Sweating”.  Add a little coarse salt and pepper if desired.  The salt helps to sweat the veggies quickly.

Pour in the carton of beef stock, tomato sauce, as many dashes of W-shire sauce as you like, mustard, and ketchup.  Stir to combine.  Scrape any burned bits off the bottom of the pan, and stir into the mixture.  Those burned bits add awesome flavor (This is called “deglazing”)

Add the seared stew meat back into the pan.  Stir

Bring mixture to a boil.  Turn heat to low.  Cover the pot with a lid and allow to simmer for a LONG time.  I simmered mine for 1.5 to 2 hours.  The longer you simmer, the more tender the meat will be.  If you don’t simmer it long enough, the meat will be tough and chewy… yuck.

Add in the diced potatoes, and continue simmering for another 20 minutes or so with the lid on until the potatoes have cooked through and reached desired tenderness.

Remove the lid, and add beans, frozen peas and corn, thyme leaves. Stir.

Taste the mixture as it cooks, and adjust seasonings as needed.  I used salt and pepper to taste, but I also used seasoned salt, rosemary, paprika, chili powder, and cumin.

The longer you leave the pot to simmer uncovered, the thicker the sauce will become because much of the moisture will evaporate (This is called “reduction”).  The starches from the potatoes and beans help with the thickening process.

If the stew is not thickening as quickly as you would like, stir the cornstarch and cold water in a separate bowl until smooth with a “milky” appearance.  This is called a “slurry”.  NEVER ADD CORNSTARCH TO A HOT MIXTURE WITHOUT FIRST MIXING WITH COLD WATER!!! I’ve made this mistake before.

Stir the mixture.  When desired thickness has been reached, ladle into bowls and serve with crusty bread.  Perfect one-pot meal on a cold night.  Enjoy leftovers for lunch tomorrow…if there ARE any leftovers 😉


Homemade (Skinny) Baked Beans – just in time for the big game!

FSCN0145[1]Don’t you just love baked beans?? They are the all-American side dish perfect for backyard barbecues in the summer or a yummy warming side dish in the dead of winter.  Right now, in the Northeast, it’s about 12 degrees outside, so I do mean “dead of winter”. Last Sunday, I decided I was going to make “summertime” food for dinner to help lift our spirits a bit. After all…it is the end of January, and although the temperature outside has only been hovering at an average 20 degrees, and we have been peppered with snow showers, the days are beginning to get a little longer meaning that spring and summer aren’t too far off.

I decided hot dogs (I use lower fat turkey dogs), my family can’t tell the difference 😉 and I decided to make homemade baked beans. I just hate those baked bean concoctions in a can. They are full of preservatives, chemicals, and GMOs. Ew! I grew up in a household where baked beans were considered a treat, and when we did get baked beans with dinner, it was the kind that came in a can. Delectable at the time, but I am much more sophisticated now (yeah, right), but still I chose to venture toward making my own baked beans from scratch.

Ok, I’ll admit that I used canned beans this time around, but next time, I can assure you I will use dried beans that require soaking. I did drain and rinse the canned beans to eliminate all that extra salt they put in the canned beans. I used what I had on hand which was 2 cans of pinto beans, and 1 can of white (cannellini) beans.

I also used turkey bacon instead of regular bacon.  I know many homemade BB recipes call for pork bacon, and while I do agree pork bacon adds great flavor, I just couldn’t wrap my head around the idea of using all that fat rendered from pork bacon. So…into the sauce mix went a bunch of stuff I had on hand, and there it was…after a few short minutes, I had a comforting, warming delicious pan of homemade baked beans!  And it could NOT have been easier.  Bye bye, canned baked beans…Hello, homemade.  Remember I do not formally measure ingredients when I’m cooking (I do, however, measure when baking), so these measurements are approximate.  Everything is “to-taste”, so you can add more of or omit any ingredients on my list.  Here goes…

Ingredients

3 cans beans, drained and rinsed (I used 2 cans pinto, and 1 can white, but use any you have on hand)

1/2 tbsp. olive oil (if needed)

1 small onion, chopped

2 garlic cloves, finely minced

4 to 5 strips of turkey bacon, snipped into bite-sized pieces

1/4 cup light brown sugar

1/4 cup pure maple syrup (not pancake syrup)

1/2 to 3/4 cup prepared BBQ sauce (I used Weber’s BBQ sauce – contains no preservatives or GMO)

1 8 oz can organic tomato sauce

1 tbsp. Worcestershire sauce

1 tbsp. prepared organic yellow mustard
1 tsp ground cinnamon

1 tsp cumin

1 tsp chili powder

1 tsp paprika

few dashes of hot sauce

salt & pepper to taste

Directions

In a medium to large saucepan, brown bacon pieces over medium heat until just beginning to brown.  Stir around a little, to separate pieces so they cook evenly.  You don’t want them to crisp up too much, so keep an eye on them.  Remove bacon from pan to paper towel line plate.  Set aside.

If needed, add a little olive oil to same pan, and add chopped onion, and begin to cook over medium heat until translucent and slightly browned (about 10 minutes).  You can help this process along by adding a little kosher or sea salt. Add black pepper too if you want. Add minced garlic.

Add drained and rinsed beans to onion/garlic mixture, and stir to combine.

Add BBQ sauce, Worcestershire, tomato sauce, maple syrup, brown sugar, prepared mustard, hot sauce, and all spices and seasonings.  Stir to combine.

Bring mixture to boil, then reduce heat, and add the bacon back into the pan.  Simmer covered on low heat for about 30 minutes or until sauce has achieved desired consistency and all flavors have married nicely.  If the sauce is too thin for your liking, remove the lid, and let stand for several minutes.  The sauce thickens as it stands.  Also, some people actually do bake their beans in the oven (hence the title – “Baked” Beans).  I did not do this, but I may try this next time to see what happens 🙂

Enjoy!

Oven Baked (Un)fried Chicken

2015/01/img_0064.jpg
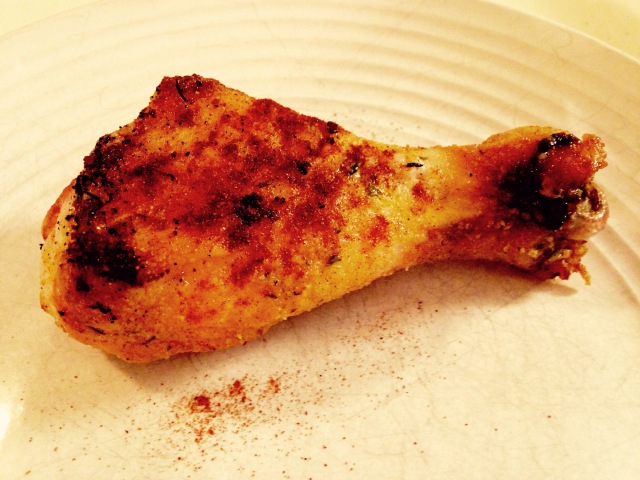
This is THE easiest, most delicious chicken ever!! Fried chicken is an all-American classic, but achieving that crispy-fried goodness can easily become a messy, time-consuming, and sometimes painful process resulting in a fatty, greasy piece of chicken.  I’ve got a healthier version that is baked in the oven with less mess.  The coating really follows the little-of-this/little-of-that design. I literally open my spice cabinet and pull out whatever I think looks good to add. I do not measure any ingredients accept for the flour and breadcrumbs.  I throw all ingredients in a zip-top bag, throw in a few pieces of chicken at a time, shake it, and bake it.  Add seasonings to taste, and YUMMY!  That chicken is DARN GOOD!

Ingredients

1 to 2 lbs chicken parts (Any cut will do.  I used drumsticks, but thighs, wings, and even boneless/skinless breasts will do)

1 tbsp canola oil (optional)

1/4 cup all-purpose flour

1/4 cup seasoned bread crumbs

Seasoning measurements are estimated, so you can tweak them to fit your own taste 🙂

1 tsp dried thyme

1 tsp seasoned salt

1/2 tbsp paprika

1/2 to 1 tbsp onion powder

1/2 to 1 tbsp garlic powder

1 tsp garlic salt

1 tsp black pepper

1/2 tsp salt

Instructions

Preheat oven to 425 degrees.  Generously coat a 9 x 13′ baking pan with cooking spray. If desired, drizzle a little canola oil over cooking spray.

In a plastic zip-top bag, add all ingredients on the list beginning with the all-purpose flour.  Close bag and shake until all ingredients are combined.

Optional:  Rinse chicken and pat dry.  I usually don’t rinse chicken, but my pieces had been frozen, so I ran them under cold water to remove any loose ice crystals.

Add 1 or 2 chicken parts at a time to flour mixture in bag. Zip top and shake bag to evenly coat chicken pieces.  Remove coated chicken pieces from bag with tongs, and place skin-side down in greased pan.  Repeat until all chicken has been breaded.

Bake in oven at 425 degrees for about 40 minutes, flipping once halfway through cooking.  When desired skin color is reached and meat thermometer reaches 175 degrees, chicken is ready.  If you are using boneless pieces, the chicken will cook in less time, so be sure to keep an eye on it.

Remove chicken to plate lined with paper towels to absorb any extra grease. Enjoy!