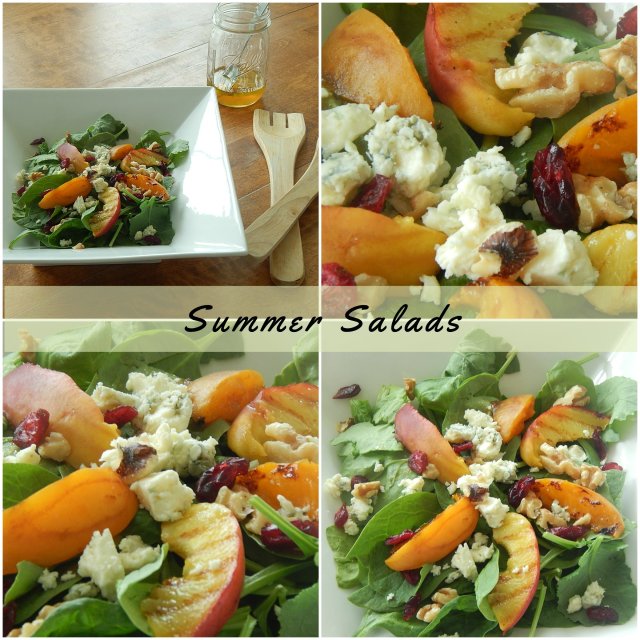
Grilled Stone Fruit and Bleu Cheese Spinach Salad with Honey Vinaigrette

Summer SaladsI get so excited about salad…seriously. And summer is the best season to play around with different combinations of flavors and textures because there’s such a wide variety of in-season fruits and veggies to try.  Salads, though historically considered the forgotten side dish (or first course) – something you have to endure in order to get to the “star” of the meal – the main course- do not only serve as a mere opportunity to consume some veggies, but can actually serve as the star of the meal. Yes, I do mean the main course! For lunch or dinner (or why not for a snack?), salads offer a pallet of different colors, flavors, and textures.  It’s artistic, really. The beauty of salad is, you can’t really go wrong.  No matter what base you use or ingredients you add in, you never wind up with a bad combination.

The basics:

    • Greens – Dark, leafy greens such as spinach, kale, Romaine lettuce, and arugula serve as not only a beautiful, rich base upon which to pile up colorful toppings, they are super healthy and tasty. Water-based lettuces such as iceberg lettuce are also a good base because they are incredibly refreshing especially on the hottest of summer days.
    • Tomatoes – Deep red tomatoes (grape, cherry, or sliced wedges of larger tomato varieties) are always a hit.  Try heirloom varieties that add different color impressions – purple, yellow or orange tomato varieties.
    • Other Veggie Add-Ins – shredded carrots, thinly sliced radishes, purple onion slivers, colorful bell pepper strips (red, orange, yellow, purple), and, of course, cucumbers
    • Protein – If serving salad as a main course, protein is an important consideration. Add meats such as chopped turkey breast or ham, grilled or roasted chicken, tuna fish (canned or fresh), other seafood such as cooked salmon, or shellfish such as shrimp and crab meat are awesome add-ins. Even hard-boiled eggs. The possibilities are endless. If going meatless, add beans, any variety or a mix of a few different varieties – garbanzos, kidneys, black-eyed peas, etc. Again, endless possibilities
    • Fruit – berries of any kind – blueberries, raspberries, strawberries, apple/pear slices. Try grilling fruit such as peaches, plums, apricots, watermelon, pineapple. So Good! Add dried cranberries. Try citrus fruit such as orange or grapefruit segments.
    • Crunch – I like some crunch in my salads. In my opinion, they make salads more satisfying. Opt for the traditional crouton (you can make these yourself), or try nuts (almonds, peanuts, chopped walnuts, pecans, hazelnuts).
    • Cheese – I don’t know about you, but I love cheese in my salad. It just adds another level of flavor and texture that’s so satisfying. Sharp, flavorful cheeses take salad to the next level.  Try feta, goat cheese, bleu cheese, fontina, parmesan, or ricotta salata (similar to feta). Sharp cheddar is an excellent addition, too. Cubed, shredded, or crumbled, you can’t go wrong with a little cheese atop your salad 🙂
    • Dressing – You can’t go wrong with a drizzle of extra virgin olive oil and any kind of vinegar – balsamic, wine vinegars, apple cider vinegar, squirt of lemon juice, etc.  YOU DO NOT NEED TO BUY BOTTLED SALAD DRESSINGS! It’s taken me awhile to realize this.  I always stocked my fridge with bottles upon bottles of salad dressing. Not anymore! Dressing is so easy and inexpensive to make yourself with ingredients you have on hand.

The salad featured in the photo is a Grilled Stone Fruit and Bleu Cheese Salad with a Honey Vinaigrette Dressing. So easy and good!  Here’s how I did it:

Spinach/Kale mixed greens
Grilled Peach and Apricot Slices – Spray a grill pan with non-stick cooking spray, and preheat over medium heat. Slice stone fruit around pit and remove (similar to how you would slice an avocado). Slice in wedges and place on grill. Grill for about 4 minutes per side.
Crumbled Bleu Cheese
Chopped walnuts
Handful of dried cranberries

For the dressing:
Most dressing recipes you read will call for a 2 to 1 ratio of oil to vinegar. I say “bunk”! I use equal amounts of oil and vinegar; otherwise, all you taste is the oil. Also, use good quality extra virgin olive oil. A little dressing goes a long way here.

1 tbs honey
3 tbs apple cider vinegar
3 tbs extra virgin olive oil
dash of salt & pepper to taste

Whisk all ingredients together and pour over salad right before serving. Couldn’t be easier!

Five Reasons Why You Should Grow Your Own Veggies (and Herbs)

PEPPER (2)When spring and summer come around, I get super excited to plant my own veggie garden.  I love being able to go out in my backyard and pick my own veggies to use in recipes or to snack on.  For Mother’s Day each year, I like to spend the day working out in the garden…readying the soil, getting the plants in the ground, and watering everything.  If I’m lucky, the kiddo will help out in the garden.  Now that she’s getting older (turning 10 this summer. YIKES!!), she’s becoming more interested in growing vegetables and, most importantly, eating them!  It’s a great way to motivate my kid who is otherwise interested in chicken nuggets and mac n cheese to grow and eat her vegetables.

Many people shy away from growing their own vegetables and herbs because they think they don’t have time, or it’s too hard, or it’s too much work, don’t have enough space, and blah blah blah… In reality though, it couldn’t be any easier or more rewarding.

Here are five reasons why everyone should grow his/her own veggies and herbs:

  1. Inexpensive It’s relatively less expensive to grow your own veggies in-season than to buy them in the grocery store.  When you buy produce in the grocery store, not only are you paying for the store’s overhead, but you’re also paying for the grocer’s delivery fees and product mark-ups (grocers charge consumers a certain percentage more than the product actually cost them). Not to mention that by the time the produce is picked from the plant, shipped, and placed on shelf in the store, the produce is not really that fresh anymore.  Packets of seeds or even partially grown seedlings are widely available and inexpensive and produce so much more fruit than you can buy in the store.  I’ve seen seed packets for as little as $0.25!! If there are 10 tomato plant seeds and each plant yields 15 tomatoes or more…you do the math!  I don’t do math; numbers aren’t my language 😉  It’s almost not worth it NOT to start a garden!
  2. ControlDo you know what happens to your store-bought fresh produce once it leaves the farm and ends up in the kitchen?  Neither do I, and frankly, I don’t want to know.  With your own veggie garden, you have direct control over what’s happening with your own food.  You control what goes into the soil, pesticide-usage (I don’t use any pesticides), and fertilizer (I don’t use that either).  No more guessing as to how many chemical processes have rained on your veggies before you got a hold of them….and no more wondering if your produce is affected by the latest contamination recalls.
  3. Gets the whole family involved: Giving children a choice of what to plant, involving them in the planting and nurturing process, allowing them the opportunity to watch their veggies grow from seed to fruit, and letting them pick their ripened veggies off the plant instills a sense of accomplishment-not to mention the influence this process has on getting the kids to eat their veggies.tomatoes
  4. Easy: If you can dig a hole and turn on a hose or water faucet, you can plant a veggie garden.  ‘Nuff said 😉
  5. Delicious:  Homegrown produce is so much tastier than store-bought produce and the whole process is more rewarding than just driving to the store and spending extra money to buy fresh veggies that can be easily grown at home.  Imagine your dinner guests’ amazement when you tell them the herbs and veggies came from your own backyard.

Does this mean I never buy produce in the grocery store? Nope.  I still buy some produce items that do not grow well in my zone, as well as out-of-season produce.  I find that through the summer months, I buy less and less at the grocery store.

Many veggies are more than suitable for container-gardening, so if you live in an apartment, or don’t have much land, you can still reap the benefits of growing your own veggies and herbs.  Stay tuned for more gardening tips, tricks, and recipes as my garden grows!

Food Hack: How to Revive Wilted Celery

so1wGL1428419200 Wow!  How dumb have I been all these years?

You know how you buy a whole celery head because you need a stalk or two for a recipe?  Then the remaining stalks sit in the crisper drawer only to become forgotten…Then they wilt, droop, and get rubbery…THEN YOU TOSS THEM??

Oh my gosh…I’ve tossed so many innocent droopy celery heads because I thought they were unusable once they wilted.  What a waste of money, not to mention, perfectly good celery.

Last night I wanted to make Buffalo Chicken Salad (recipe coming soon), and all I had was droopy celery in the crisper drawer.  I was truly about to toss it, and run to the store in the midst of the blizzard we had (we got over 10 inches of snow) yesterday until my genius husband said, “My mother used to cut off the root end, and put the celery stalks in water to crisp them up.”

How have I not known about or even thought to do this?  Maybe everyone knew about this, and I’m the only one who didn’t.

Oh well…now I know…

Here’s how to do it:

Trim the celery’s root end – about an inch up the celery stalks. (You’d do this anyway if you were using celery in a recipe.  just like when you trim the end off the celery before you chop it up)

Place in a tall drinking glass.  If you have large mason jars, they’re perfect for this.  Fill the jar with cold water.  That’s it!!  In about an hour, you have perfectly crisp celery that’s just like new.  The water travels up the veins in each stalk and even revives the leaves!

I left the celery on the counter because I was going to use it shortly thereafter, but if you’re not going to use it right away, place the jar of celery in the fridge.  You can keep it in there for about a day or so.

Don’t forget to wash the celery before you use it.

Linguini with Kale Pesto and Shrimp

DSCN0191[1]Pesto sauce.  It’s that velvety green goodness that clings to pasta in the most decadent way.  It hugs each strand of pasta as if hanging on for dear life.  There are so many ways to make pesto sauce, and it’s SO EASY to make.  Just a few ingredients into a food processor and it’s done!

Classic pesto sauce is a combo of fresh basil, fresh garlic, sometimes pine nuts, fresh parmesan cheese, and olive oil.  You’d think with such a perfect combination of flavors, why mess with perfection, right?  Well…lately I’ve been thinking about changing up the ingredients a little to create new variations on pesto sauce.  I’ve heard of pesto made with arugula, spinach, even green peas, but I had a brainstorm and thought…why not kale?  Kale is so popular now, that I thought why not give it a try as a pesto sauce?  When I told my husband about my idea, he grimaced a little, and half-heartedly said, “It’ll PROBABLY be good.”

…I don’t do “PROBABLY good”, so the challenge was on…

So I threw some kale, garlic, olive oil, parmesan cheese in a food processor, boiled some linguini, and sauteed some shrimp, and let me tell you…he gobbled almost the entire serving bowl, literally.  I couldn’t believe it.  He said he would’ve finished the whole bowl, but he was full.  And there it is.  BOOM!

I didn’t add nuts because first, I didn’t have any, and second, I don’t really think they’re needed.  If you want to though, I think almonds would be great in this kale pesto.  If you try it, let me know.

First, take a bunch of kale greens, and rinse them really well.  You’d be surprised how much loose dirt comes off them. Dry them with papertowels.

I decided to tear the greens off the stems.  The stems are quite fibrous and tough, and the leaves tear off really easily.

DSCN0180[1]Then, throw the leaves into a food processor, and add about 3 cloves of peeled garlic, about 1/4 cup freshly grated parmesan cheese, kosher salt & freshly ground black pepper to taste.

DSCN0182[1]Close the lid, and pulse a couple times to break up everything.  Then open the spout at the top, turn the food processor on, and as it whirs, pour in about 1/3 to 1/2 cup extra virgin olive oil.  Continue to process for about 30 seconds until desired consistency is reached.

Pour into a bowl and set aside.

Now you can either make the pesto ahead of time, or if you’re an adept multi-tasker, you can make it while the pasta cooks and the shrimp sautes.  If you do it this way, you’ve got dinner in about 15 minutes or less.  Not bad, huh?

To saute shrimp, place them in an even layer in a non-stick skillet over medium heat.  Cook for about 3-4 minutes per side until shrimp are opaque, pink, and tightly curled.

DSCN0188[1]Ingredients

1 bunch kale greens, rinsed, dried, and torn from stems

3 cloves garlic, peeled

1/4 cup freshly grated parmesan cheese

1/3 to 1/2 cup extra virgin olive oil

~1 tsp each of Kosher salt and freshly ground black pepper

1 12 oz. bag frozen shrimp, thawed, peeled & deveined, tails removed

1 box linguini pasta (or any long pasta you happen to have)

Directions

  1. Place torn kale greens into food processor
  2. Add garlic cloves, grated parmesan, and salt & pepper to food processor.
  3. Close the lid, and pulse a few times to break up ingredients.
  4. Open the chute on processor lid, and turn on food processor.
  5. As it processes, pour the extra virgin olive oil into the chute.
  6. Continue to process for up to a minute until desired consistency is reached.
  7. Taste mixture, and adjust seasonings as needed.
  8. Pour pesto into bowl and set aside.
  9. Bring a large pot of salted water to a boil.
  10. Add linguini, and boil according to package directions.
  11. Meanwhile, saute shrimp in non-stick skillet over medium heat for about 3-4 minutes per side.  Yes, you will have to flip each and every shrimp 🙂  Saute until shrimp are opaque, pink, and tightly curled.
  12. With tongs, remove al dente linguini from boiling water and place directly in skillet with shrimp. RESERVE THE PASTA WATER!!
  13. Add the pesto sauce mixture to the pasta and shrimp in the skillet and toss together with tongs.
  14. If needed, add reserved pasta water to the mixture a ladle-full at a time to loosen up the sauce.  Do this until desired consistency is reached.
  15. Place in a serving dish.
  16. Serve hot or warm with warm crusty bread.
  17. Watch your husband who reluctantly said, “It’ll PROBABLY be good” devour the entire serving bowl 🙂